iPhone is Not Charging: 9 Ways To Fix It (2026)
- Find out the issues that are causing your iPhone not to charge.
- Discover the different ways how to troubleshoot an iPhone that won’t charge.
- Seek professional help from Apple Support or third-party repair shops if needed.
FIXED: iPhone Not Charging (Quick Ways)
Check Your Charging Cable and Adapter
Check the Lightning Cable:
Check for any signs of physical damage like fraying, cuts, broken, or bent prongs.
Use a Different Cable:
Try to connect your iPhone with a different lightning cord. If it works, your original lightning cable may be defective. If it doesn’t, try the next solution.
Try Another Outlet or USB Port:
Charge at a different electrical outlet or USB port. If it works, your adapter may need to be replaced.
Clean Charging Port
Clean the charging port on your iPhone using a soft, dry brush or a clean toothbrush to remove any debris or lint that may be blocking the connection.
Restart Your iPhone
- Hold the power button.
- Slide the power off slider.
- Turn it back on.
Update your iPhone’s Software
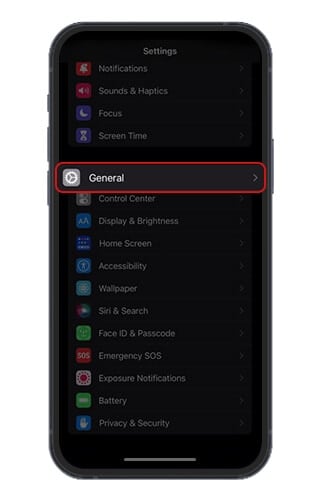
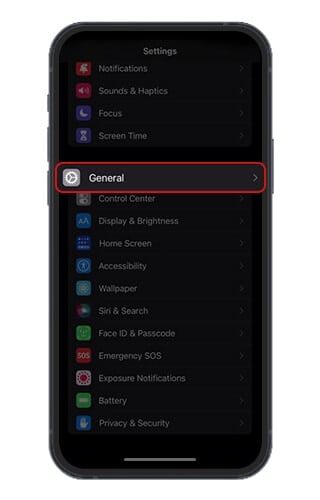
- Launch the Settings app.
- Tap General.
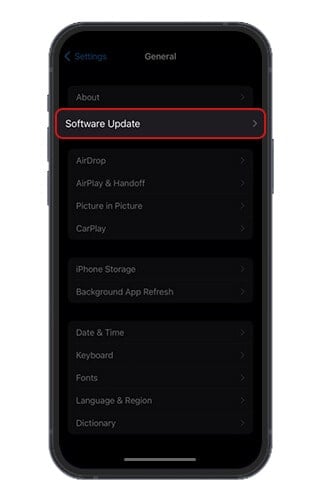
- Select Software Update.
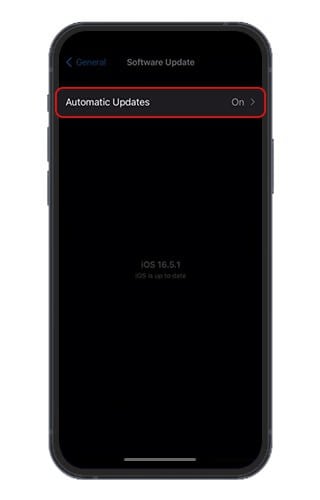
- Install any available updates.
Seek Professional Help
If the problem persists after trying these steps, it’s recommended to contact Apple Support or visit an authorized service center for further assistance.
In this article:
- Causes Why Won’t My Phone Charge
- Solution 1: Check Your Lightning Cable
- Solution 2: Examine Your Power Adapter
- Solution 3: Clean Your iPhone’s Charging Port
- Solution 4: Restart Your iPhone
- Solution 5: Update iOS
- Solution 6: Try Wireless Charging
- Solution 7: Perform a Factory Reset
- Solution 8: Seek Professional Help
- Solution 9: Sell Your iPhone
Many people experience the common issue of their iPhones not charging when they’re about to leave for an important event. Despite plugging in the device, it fails to receive any power, leaving users puzzled about the cause of the charging issue.
In this article, we’ll explain what might be causing your iPhone’s lack of battery life and offer solutions to get it back up and running!
Reasons Why Your iPhone is Not Charging
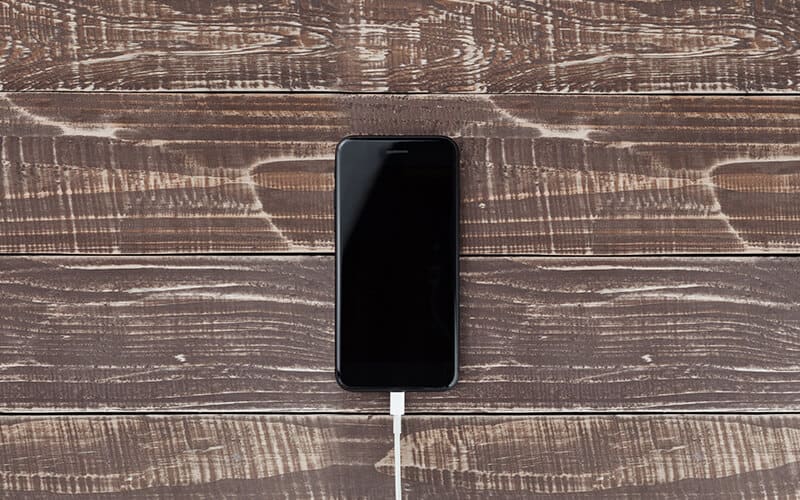
Regarding charging issues, it is essential to recognize the difference between software and hardware-related problems. A visit to an Apple store might be required if there are any issues with the latter type of problem, whereas simple troubleshooting may suffice for a software issue.
Let’s explore both sides of categories—as well as some typical scenarios involving charging difficulties.
Software vs. Hardware Problems
Software issues can appear in various forms, such as unanticipated battery drainage, stalls and locks while apps run, random reboots, or out-of-the-blue notifications. Fortunately, many charging problems related to software could be fixed with some easy steps like restarting the iPhone device or updating the iOS version and resetting it back to its factory settings.
On the other hand, if the hardware is causing trouble diagnosing may prove difficult since one must check for any damages on the cable or adapter used for charging purposes. Plus, inspect the power port by attempting different cables and investigating whether anything has been left inside blocking the proper flow of electricity – replacement might have to happen. Replacing/alternative resources should provide solutions when cleaning does not solve your problem.
Common Charging Scenarios
When it comes to charging difficulties with an iPhone, common causes are the following:
- Frayed or worn-out lightning cable.
- The adapter doesn’t fit right or has incorrect voltage output power.
- Liquid damage
- Debris like dust and lint gather in the charging port.
In this part below, we’ll offer some steps to sort out these common situations & get your phone charged once again!
Solution 1: Check Your Charging Cable
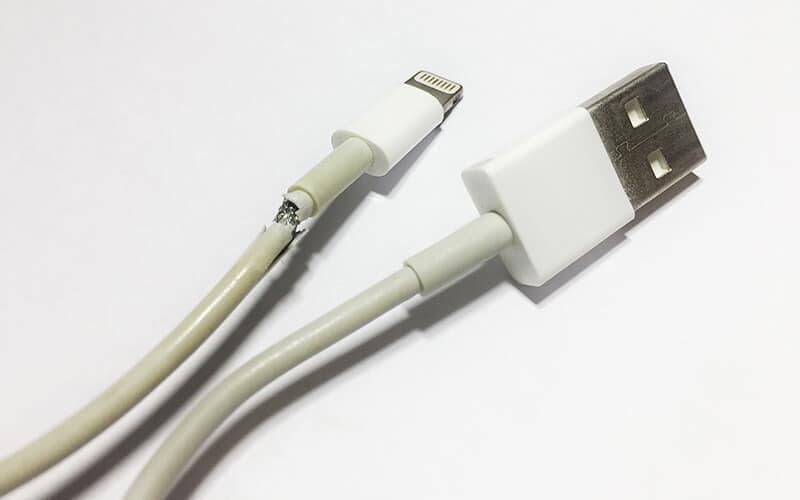
Check the Signs of Damage
Carefully examine the lightning cable for any signs of physical damage like fraying, cuts, broken, or bent prongs. Pay close attention when inspecting your cable; minor problems can cause major issues in your device if not replaced quickly and correctly.
Test with Another Cable
To check this, try connecting to a different USB port, such as one on your computer’s USB port with the same or another lightning cable. If it starts working, you know it was likely due to a fault in the original cord. Replace it and see if this resolves matters for good!
Try another outlet or USB port. This will confirm whether that specific port has become unusable instead of simply swapping out cords repeatedly until something works again temporarily!
Solution 2: Examine Your Charging Adapter
To ensure that your charging adapter is compatible with your device, it’s essential first to identify its manufacturer and model. Once this information has been gathered, one can check for compatibility issues.
Different power sources could be explored in case of issues with the original charger. Doing so may help diagnose whether or not there are underlying problems causing a lack of charge on your device from the current source provided by said adapter.
Check Compatibility
To guarantee that your third-party charging adapter is suitable for your iPhone, double-check to ensure the accessory, input voltage, and current requirements match the device’s requirements. USB-A to Lightning and USB-C to Lightning cables can be used with this adapter.
Power Adapter Specifications
- Output Port: USB-C
- Minimum Power Output: 20 W/18 W/5 W
- Frequency: 50 to 60 Hz, single phase
- Line Voltage: 100 to 240 VAC
- Output Voltage/Current: 9 VDC/2.2 A
Try Alternative Power Sources
If your iPhone isn’t charging properly, try connecting it to different power sources. Plug the USB cable into a wall adapter and outlet securely. Alternatively, charge your phone off another computer port or via a portable battery pack.
If the device charges when connected one way but not another, you may have an issue with said source — such as faulty outlets or ports — that needs either repairing or replacing for it to work correctly again.
Solution 3: Clean Your iPhone's Charging Port
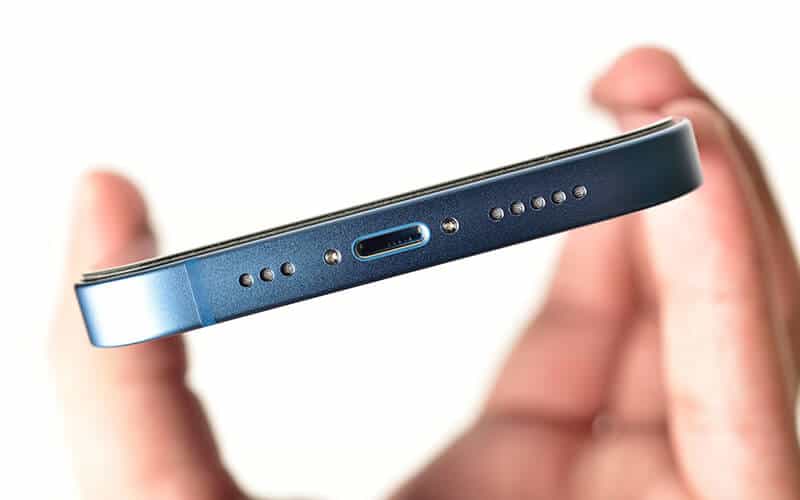
The iPhone charging port is not working due to blockage, preventing a steady connection between the cable and your iPhone. Let’s investigate how to identify such debris in the port and safely remove it.
The first thing you should check is both your adapter and charging cable – if they’re still functioning properly, we can move on to cleaning out any obstructions in your iPhone charging port.
Identifying Debris
In order to ensure the charging port of your iPhone is clear of debris, use a flashlight to take a look inside where you plug in the cable. Check for any lint or dust blocking it from establishing an effective connection.
If particles obstruct this area, then the time has come to clean out its port.
Safe Cleaning Techniques
If your iPhone isn’t charging, you can remove the lint or debris on the charging port using a toothpick or toothbrush. Make sure to be delicate while taking out any particles and not harm the internal pins in the port.
Once you have cleared away all dirt, test it using a lightning cable to see if that solves your issue. If still unsuccessful at charging up, look into alternate power supply methods or contact professionals for further advice on dealing with this matter. Avoid blowing compressed air inside the outlet as advised by Apple Incorporated itself.
Solution 4: Restart Your iPhone
Press and hold the power button together with the volume down button on your iPhone until you see the Apple logo come up.
This action will restart your device, allowing it to refresh its software, which can fix various charging issues. Once it reboots, check if everything works as expected when connecting to charge again.
Solution 5: Update iOS
Downloading the most recent iOS version can help restore your device’s proper charging function. To update your iOS, follow the steps outlined below.
- Launch Settings on your iPhone.
- Tap General, then Software Update.
- Choose the one you want to install if there is more than one software update option.
- Select Install Now or Download and Install, depending on your device.
- Enter your passcode if prompted, then select tap Install Now.
Once you have installed the latest update on your phone, check if normal charge capabilities are restored for effective use again.
Solution 6: Try Using Wireless Chargers
You may opt to wireless chargers if the above solutions do not work. We will review compatible models and help you find the right one for your device.
When considering which wireless charger to purchase, it’s important to remember that not all chargers are suitable for every model of iPhone. With careful selection, finding something suited to your specific needs should be no difficulty.
Compatible iPhone Models
Beginning with the iPhone 8, the iPhone SE, and onward, all Apple iPhones now offer Qi-certified wireless charging capabilities.
Choosing the Right Wireless Charger
Before you go for a wireless charger for your iPhone, make sure it uses the Qi charging standard and is suitable for your particular model. And remember to also take into account components such as cost and design.
When charging wirelessly, strip away all cases incompatible with this technology.
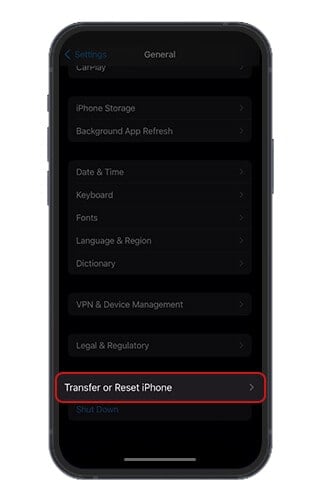
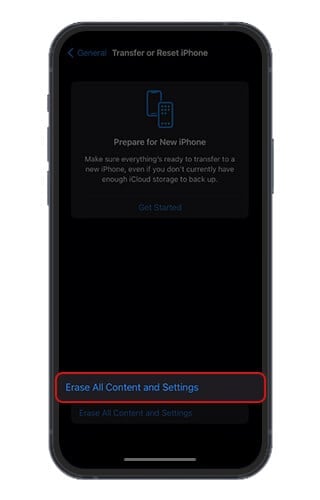
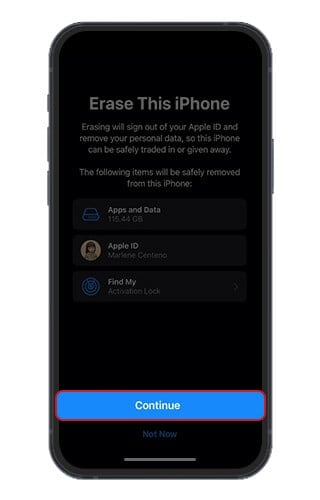
Solution 7: Perform a Factory Reset
If trying the basic steps fails to resolve your iPhone’s charging problem, you may have to resort to a factory reset as an ultimate measure. All data and settings stored in your device must be backed up via iCloud or a computer prior since it will get wiped out once this process has been done.
To perform a factory reset, go through the following steps:
- Launch Settings on your iPhone.
- Tap General, then Transfer or Reset [Device].
- Select Erase All Content & Settings.
- Enter your Apple ID password or iPhone passcode when prompted.
Depending on how much information there is on the device, it usually takes half an hour or only several minutes to complete this procedure.
Once completed with your resetting task, test if the phone is charging again.
Solution 8: Seek Professional Help
You can contact Apple Support via phone, email, or chat to help fix your iPhone charging problem. It’s possible to make a Genius Bar appointment at your local Apple Store too. If you’d rather take the third-party repair route, plenty of those are also available.
Apple provides various options for assistance with any difficulties relating to its products. Contacting them via one of these methods and visiting an authorized outlet is suggested to get help resolving issues concerning your device quickly and easily!
Apple Support
Visiting an Apple Store with a scheduled appointment is the best way to get technical support or repair services for your Apple products, as it can help you skip queues. You may contact Apple Support through phone calls or chats to book that appointment.
Third-Party Repair Shops
If you’re not comfortable visiting an Apple Store or if they can’t repair your iPhone, another option is to go through a third-party service provider. You might be able to find them via online directories and forums.
Apple also has certified experts who are accessible for getting help with repairs to fix any issues on iPhones – without invalidating the original manufacturer’s guarantee from Apple itself!
Solution 9: Sell Your iPhone
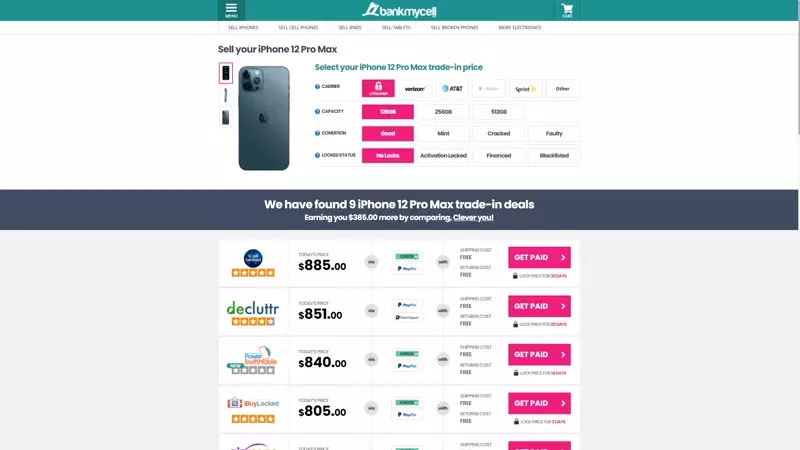
Selling your iOS device is also an option. You can use the cash you will get to upgrade or purchase a new phone. We recommend using our platform to choose among the TRUSTED buyback stores in the country quickly.
We pay the most money compared to carriers and retail stores, as well as FREE shipping and returns if you change your mind about selling your device. We also offer many payment options you can choose according to your preferences.
All you have to do is follow these steps:
- Visit the BankMyCell website.
- Select Sell iPhones and choose the model you have.
- Provide accurate details of your device, like the carrier, capacity, condition, and locked status.
- Choose the buyback store you prefer.
- Select Get Paid and follow the on-screen instructions.
You can read this article for more information and store options.
Summary
A working iPhone needs to be fully charged; if it isn’t, there may be several causes. Damaged cables or software problems could explain why the device is not charging.
This article has recommended troubleshooting steps that can help identify and fix the issue swiftly so your phone will function as intended again. If any of these solutions don’t resolve the matter, then seeking support from Apple Support or third-party repair services is a wise move in order to get an effective solution.
Frequently Asked Questions
How Do I Reset My iPhone When It Doesn't Charge?
If you’re struggling to charge your iPhone, you can perform a hard reset. This solution will not delete your data. It will only restart your phone and refresh its memory.
- Start by pressing and quickly releasing both the volume up button and the volume down button.
- Press and hold onto the side/power button until an Apple logo shows on the screen.
- Release once it appears.
How Do I Know If My Charger Port is Damaged?
The port may be faulty when your charger has difficulty connecting to your device, or it appears not to respond while plugged in. It is crucial that you get it checked right away. Damages caused by a damaged lightning port could affect the device and its corresponding charger.
How to Clean the iPhone Charging Port?
Apple does not recommend using compressed air to clear the small particles and other debris on your charging port. You can use a toothpick with light pressure carefully to clean it. Be careful, as the port is prone to damage.
To ensure your iPhone’s charging port is adequately cleaned, turn off the device and check it using a flashlight, cellphone camera, or magnifying glass. Once finished reconnecting its Lightning connector, power on the phone again.
What Do I Do If My iPhone is Not Charging When Plugged in?
To make sure your phone can get power, try out these solutions:
- Check that the charger and cord are in good working order.
- Wipe down both ends of the cable as well as any charging port on the device.
- Switch to a new set of cords and adapters if possible.
- Restart your phone when its battery is drained. Just let it charge up for some minutes before powering back on again afterward.
How to Get Water Out of the iPhone Charging Port?
You may wonder how to dry the charging port if water enters it. Here’s a step-by-step guide on how to get liquid out of the charging port:
- Power off your iPhone immediately to prevent any potential damage.
- Avoid shaking or blowing air into the port, as it may push the water further inside.
- Gently wipe the exterior of the iPhone with a soft, dry cloth to remove any excess moisture.
- Use a toothpick or dry cotton swab wrapped in a non-abrasive cloth to clean the charging port carefully. Be gentle and avoid applying excessive force.
- If the water doesn’t come out easily, use a hairdryer in a low, cool setting. Keep the dryer at a safe distance to prevent heat damage, and use a continuous sweeping motion to blow cool air into the charging port.
- Allow your iPhone to sit in a dry and well-ventilated area for at least a few hours, preferably overnight, to let any remaining moisture evaporate.
- After ensuring your iPhone and charging port are completely dry, you can try charging it again.
Remember, if the charging port continues to have issues or you’re uncertain about performing these steps, it’s advisable to seek professional assistance from Apple Support or visit an authorized service center for an iPhone charging port repair.
